Goal
The goal of this setup is to create a site-to-site connection between my home environment and my server in datacenter colocation. More sites can easily be added later.
Setup
For this walkthrough, I’m using 2 sites.
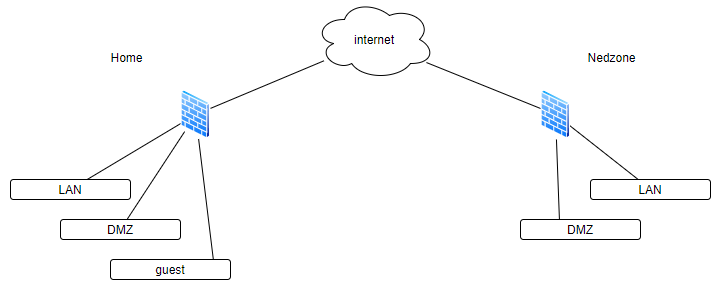
Home
Firewall: Untangle
LAN: 192.168.1.0/24
DMZ: 192.168.2.0/24
Guest: 172.23.172.0/24
Nedzone
Firewall: Untangle
LAN: 10.10.11.0/24
DMZ: 10.10.12.0/24
Diagram
The startup setup looks like this.
Network design
Home
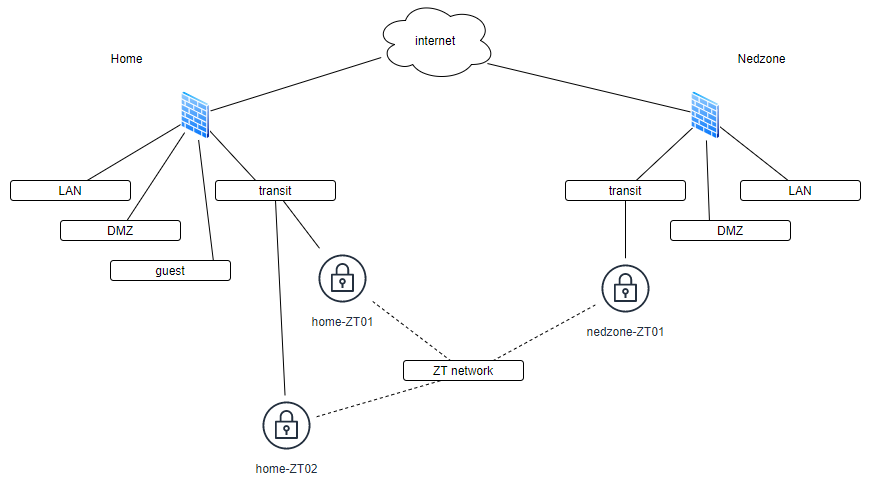
My servers at home are not connected to a UPS, only my network infra. Therefore, I want 2 ZT hosts:
Home-ZT01: Hyper-V VM
Home-ZT02: raspberry pi 3b+ running Raspbian, with PoE hat
Nedzone
The server in the datacenter is hooked up to a UPS/generator, so no need for a redundant setup here. Since it’s only a single server, if the hypervisor fails, it doesn’t matter how many ZT VM’s I have.
Nedzone-ZT01: Hyper-V VM
Routing
To prevent asynchronous routing, a new transit network will have to be added to each firewall. Routing between the firewall and ZT will be done using BGP. Routing between ZT nodes will be done using OSPF.
Home
Subnet: 10.10.10.32/29
Home-ZT01: 10.10.10.34
Home-ZT02: 10.10.10.35
FW01: 10.10.10.37
Nedzone
Subnet: 10.1.1.8/29
Nedzone-ZT01: 10.1.1.12
FW02: 10.1.1.9
Diagram
The end result should look like this:
Configuration
Home
I used Debian/Raspbian for my nodes.
Home-ZT01
Install ZT
curl -s https://install.zerotier.com | sudo bash
Join the network
zerotier-cli join xxxxxxxxxxxxxxxxxxx
Enable ipv4 forwarding
nano /etc/systemctl.conf
Uncomment the line “net.ipv4.ip_forward=1”
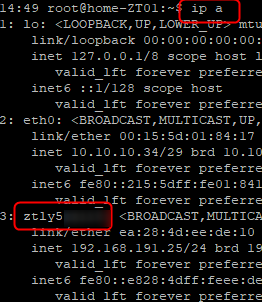
Get ZT interface name
We’ll need the interface name of the ZT NIC for our Quagga config.
Ip a
Install Quagga
apt install quagga
enable BGP & OSPF daemons
nano /etc/quagga/daemons
add the following lines:
zebra=yes
bgpd=yes
ospfd=yes
ospf6d=no
ripd=no
ripngd=no
isisd=no
babeld=no
Add the zebra config:
nano /etc/quagga/zebra.conf
interface eth0
ip address 10.10.10.34/29
!
interface lo
!
interface ztly5xxx
ip address 192.168.191.25/24
!
ip forwarding
!
!
line vty
!
Now add the BGP config.
nano /etc/quagga/bgpd.conf
!
router bgp 7675
bgp router-id 10.10.10.34
network 192.168.191.0/24
redistribute ospf
neighbor 10.10.10.37 remote-as 1
neighbor 10.10.10.37 weight 100
!
address-family ipv6
exit-address-family
exit
!
route-map backup permit 10
!
line vty
!
and finally the OSPF config
nano /etc/quagga/ospfd.conf
interface eth0
!
interface lo
!
interface ztly5xxx
ip ospf priority 50
ip ospf area 0.0.0.0
!
router ospf
ospf router-id 192.168.191.25
redistribute connected
redistribute static
redistribute bgp
network 10.10.10.34/29 area 0.0.0.0
!
route-map backup permit 10
!
line vty
!
Reboot the server.
That’s it for this ZT node.
home-ZT02
Follow all the steps of home-ZT01. I used the following config files for this node:
zebra.conf
(the wlan0 interface comes from the on-board wifi adapter of the raspberry pi, not used in this setup)
!
interface eth0
ip address 10.10.10.35/29
!
interface lo
!
interface wlan0
!
interface ztly5xxx
ip address 192.168.191.72/24
!
ip forwarding
!
!
line vty
!
bgpd.conf
!
router bgp 7675
bgp router-id 10.10.10.35
network 192.168.191.0/24
redistribute ospf
neighbor 10.10.10.37 remote-as 1
!
address-family ipv6
exit-address-family
exit
!
!
line vty
!
ospfd.conf
!
interface eth0
!
interface lo
!
interface wlan0
!
interface ztly5xxx
ip ospf priority 20
ip ospf area 0.0.0.0
!
router ospf
ospf router-id 192.168.191.72
redistribute connected
redistribute static
redistribute bgp
network 10.10.10.35/29 area 0.0.0.0
!
line vty
!
FW01
My firewall of choice is Untangle (really great bang per buck for home use). Here, we need to set up dynamic routing via BGP.
Configure dynamic routing on Untangle
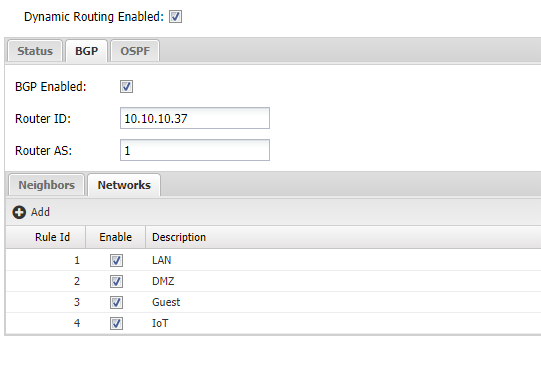
Go to Config > network > advanced Dynamic routing, and check the ‘Dynamic Routing Enabled’ box.
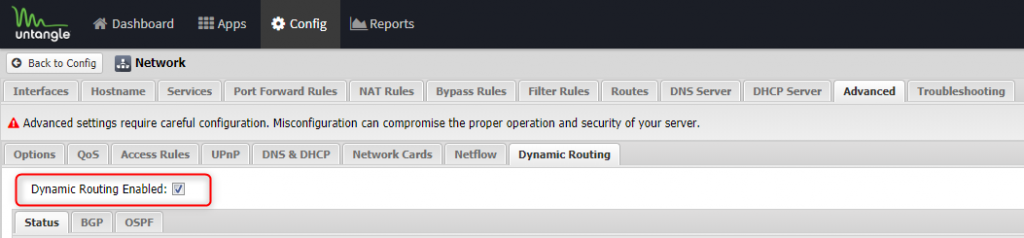
Next, click on the BGP tab and enable BGP. Set up the following:
- Router ID: 10.10.10.37
- Router AS: 1
Set up the neighbors:
| description | IP address | AS |
|---|---|---|
| home-ZT01 | 10.10.10.34 | 7675 |
| home-ZT02 | 10.10.10.35 | 7675 |
Set up the published networks:
| Description | Network | Netmask/prefix |
|---|---|---|
| LAN | 192.168.1.0 | 24 |
| DMZ | 192.168.2.0 | 24 |
| Guest | 172.23.172.0 | 24 |
Nedzone
We’ll mostly repeat the steps from the Home environment here.
Nedzone-ZT01
Repeat the process of installing and configuring ZeroTier and Quagga, using the following config files.
zebra.conf
!
interface eth0
ip address 10.1.1.12/29
!
interface lo
!
interface ztly5xxxx
ip address 192.168.191.204/24
!
ip forwarding
!
!
line vty
!
bgpd.conf
!
router bgp 7675
bgp router-id 192.168.191.204
network 192.168.191.0/24
redistribute ospf
neighbor 10.1.1.9 remote-as 5555
!
address-family ipv6
exit-address-family
exit
!
line vty
!
ospfd.conf
!
interface eth0
!
interface lo
!
interface ztly5xxx
ip ospf area 0.0.0.0
!
router ospf
ospf router-id 192.168.191.204
redistribute connected
redistribute static
redistribute bgp
network 10.1.1.8/29 area 0.0.0.0
!
line vty
!
FW02
Again, repeat the steps for enabling and configuring BGP on Untangle, using the following settings:
- Router ID: 10.1.1.9
- Router AS: 5555
Set up the neighbors:
| description | IP address | AS |
|---|---|---|
| nedzone-ZT01 | 10.1.1.12 | 7675 |
Set up the published networks:
| Description | Network | Netmask/prefix |
|---|---|---|
| LAN | 10.10.11.0 | 24 |
| DMZ | 10.10.12.0 | 24 |
Closing
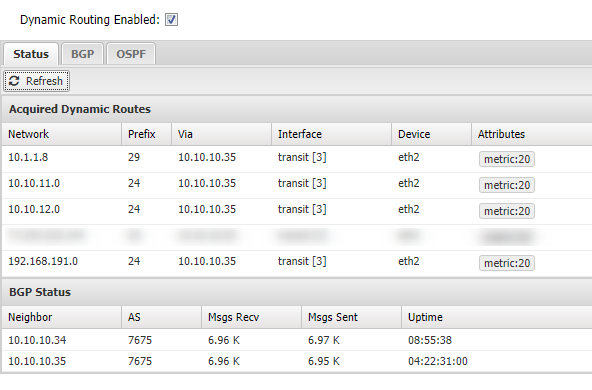
At this point, you should start seeing your routes being updated in Untangle:
Or you can check the OSPF neighbors via the quagga cli:
vtysh
show ip ospf neighbor

A traceroute from the LAN network at home to LAN in Nedzone:
